KVM Hypervisor (Optional)#
This document demonstrates the steps for setting up an environment that implements the Robotics KVM virtualization solution. The examples below are provided in both QEMU command-line format and libvirt XML parameter format.
Note
The parameter values in the examples below are not fixed. Please modify them based on your hardware resources, firmware/image paths, and business requirements.
Scenario#
The following diagram shows the overall architecture of the Robotics KVM solution on Intel® Core™ Ultra Series 3, organized into three layers: the Intel® Core™ Ultra Series 3 hardware, the Host OS, and the Guest OS. Each of the hardware and Host OS layers is further partitioned into a real-time (RT) domain and a non-real-time (non-RT) domain.
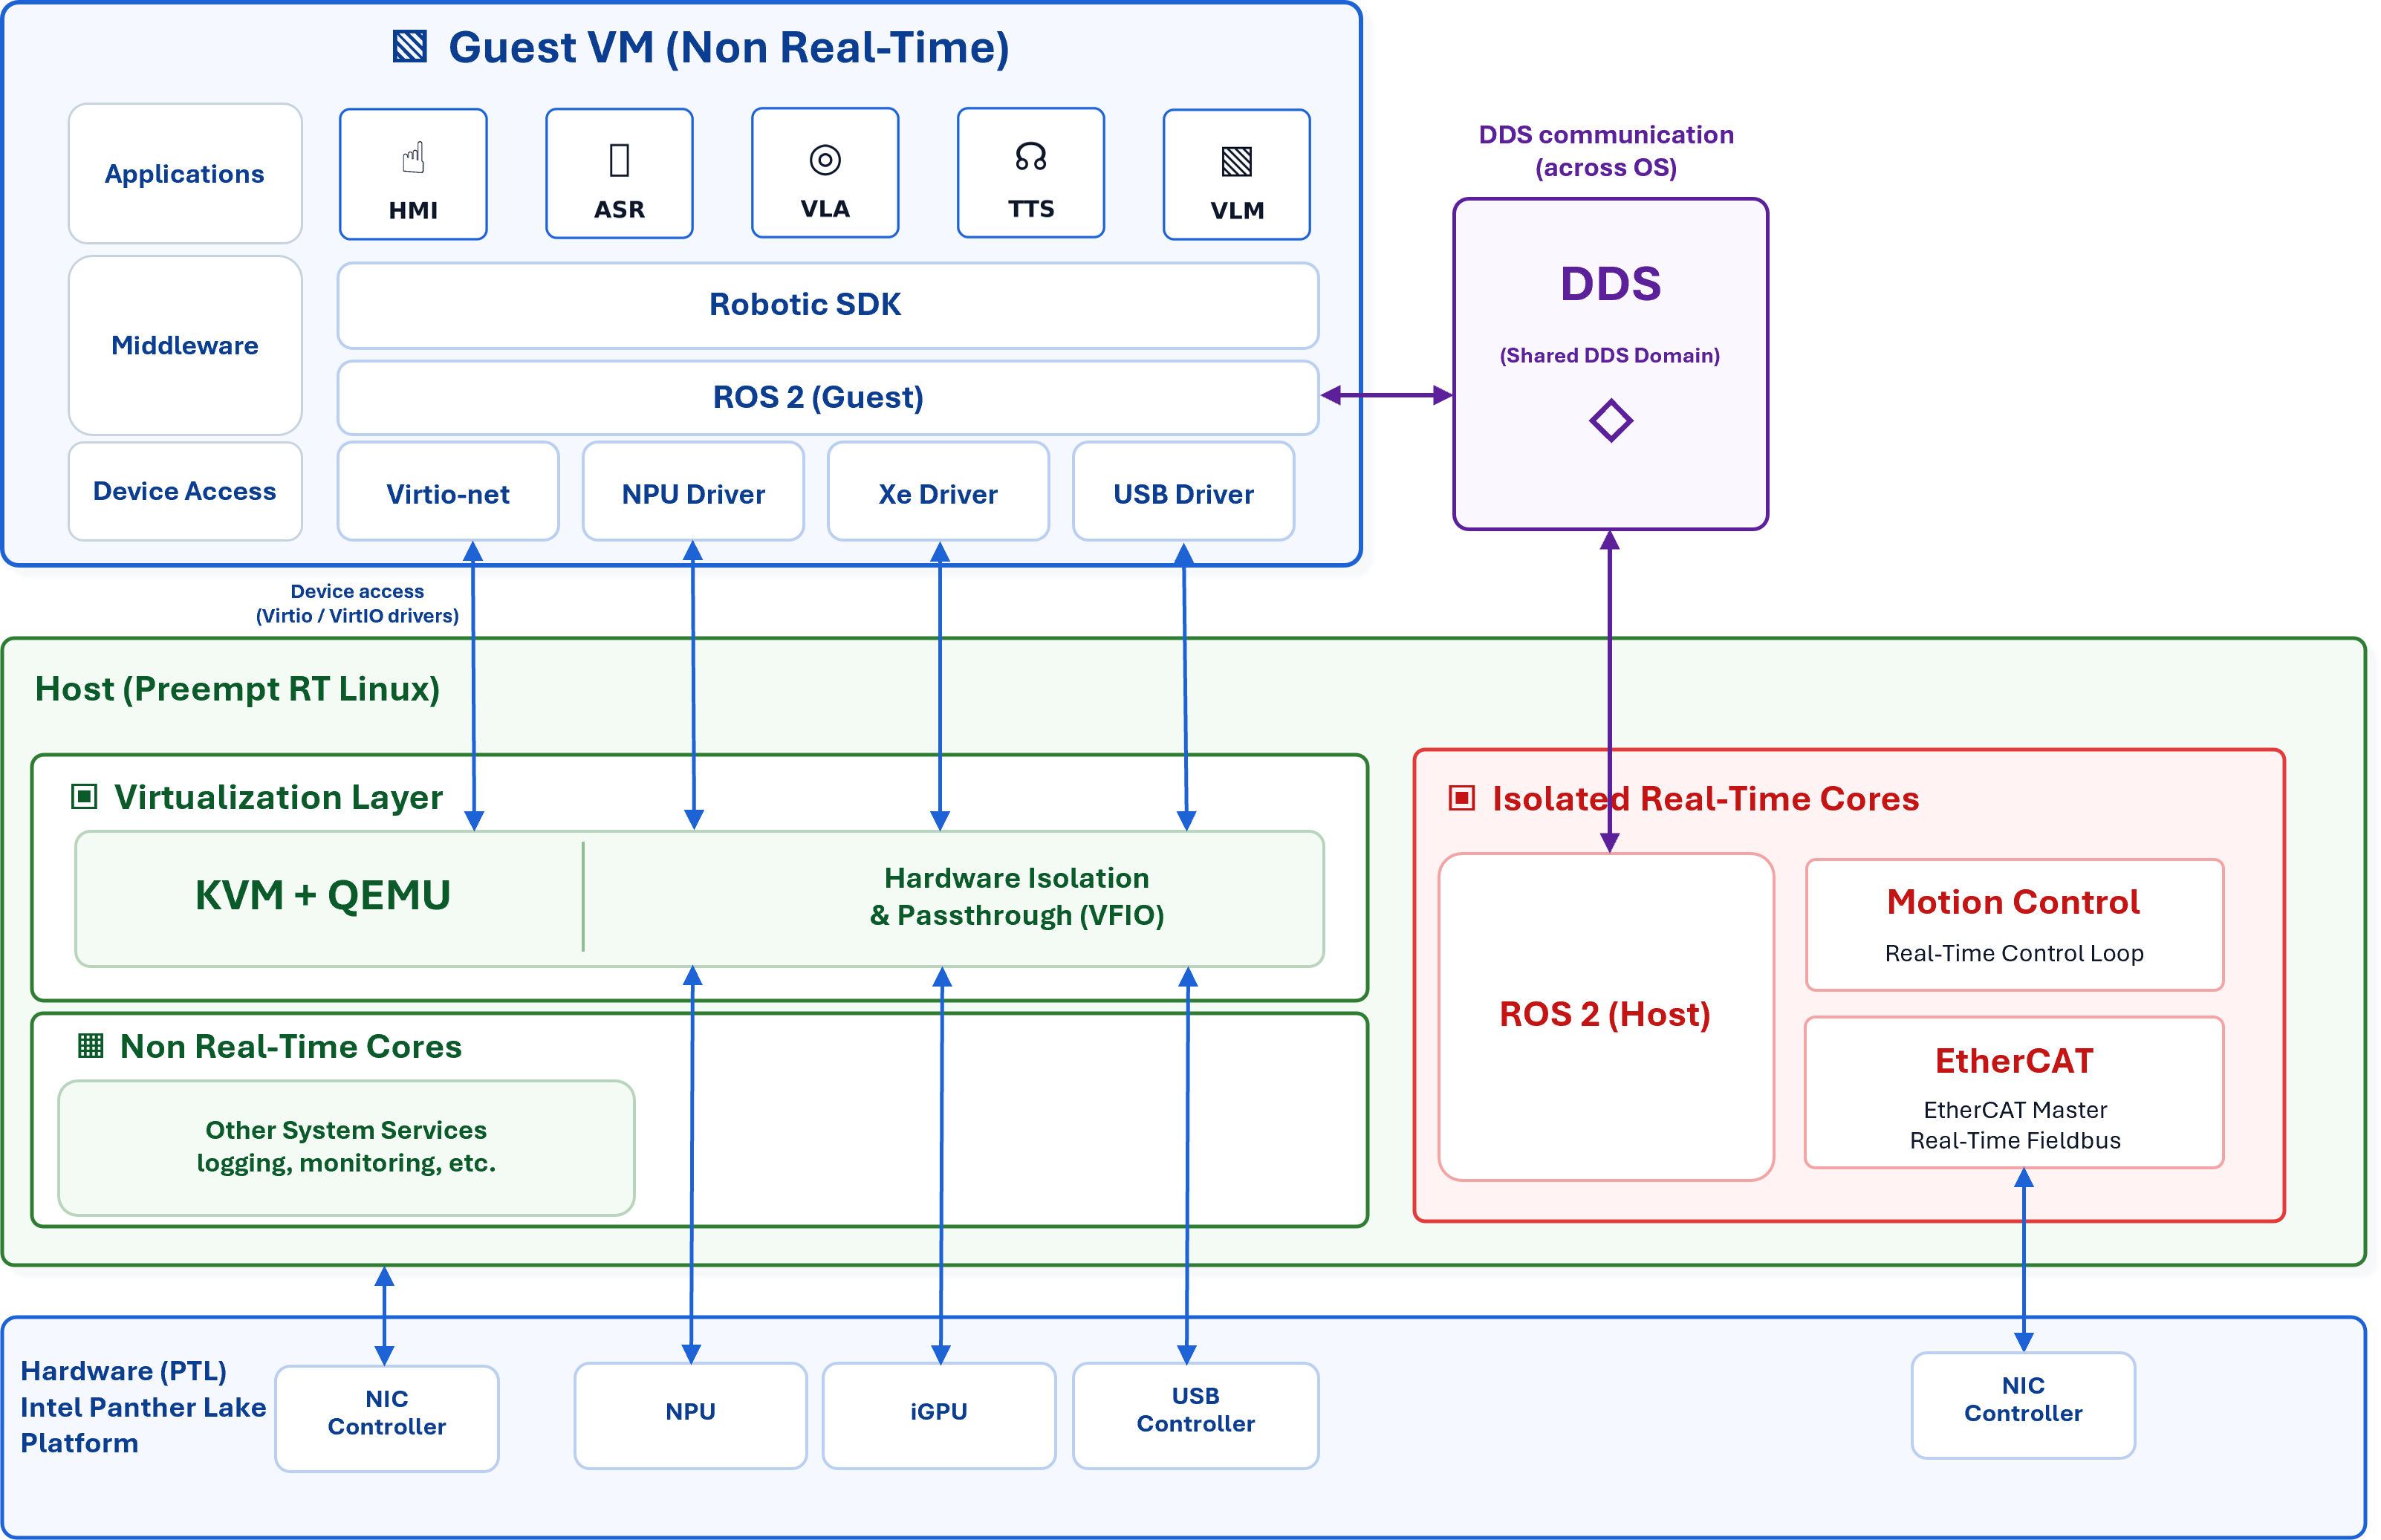
(Hardware, Intel® Core™ Ultra Series 3 platform) — Using Intel® Core™ Ultra Series 3 X7 358H as an example: dedicated to the RT domain (4x LPE cores + a NIC), shared by the non-RT domain and Guest OS (4x P cores, 8x E cores, NIC, USB, and NVMe), and passed through to the Guest OS (Intel® Arc™ graphics, Intel NPU, USB controller)
(Host OS) — Ubuntu 24.04 with a 6.17 RT kernel. Its RT domain maps to the L1 RT hardware and runs motion control, using the RT NIC to drive external motors over EtherCAT. Its non-RT domain maps to the L1 non-RT hardware and provides KVM + QEMU virtualization services.
(Guest OS) — Ubuntu 24.04 with a 6.17 kernel. It receives Intel® Arc™ graphics, Intel NPU, and USB controller via KVM passthrough from the Host, and shares net and NVMe with the Host through virtio.
Basic Environment Setup#
Install Ubuntu 24.04 as the host OS#
Install and set up Ubuntu 24.04 on the main storage. Follow the steps to set up the OS and APT repository: OS Setup.
Set up real-time Linux. Follow the steps to set up real-time Linux: RT Linux. Follow the steps to complete real-time tuning: RT Tuning.
Install host packages for the KVM/QEMU system.
sudo apt update
sudo apt install qemu-system-x86 qemu-utils ovmf bridge-utils pciutils \
        libvirt-daemon libvirt-daemon-driver-qemu libvirt-daemon-system libvirt-clients
Set up virtualization related setting. Make sure
Intel (VMX) VirtualizationandVT-dare enabled in BIOS setting. Huge pages are also needed to boot the Guest OS. Edit boot parameters in host environment, add:
default_hugepagesz=1G hugepages=[size allocated for Guest OS in GB] hugepagesz=1G
Build the Guest OS image#
Build a QEMU qcow2 image that runs Ubuntu 24.04 OS. Refer to Build Image.
Set up the OS and install packages for the VM. Follow the steps to set up the OS and APT repository: OS Setup.
Build the OVMF and iGPU ROM file#
Refer to Build OVMF for KVM to build a specific OVMF image and an iGPU ROM file.
KVM Example Parameters#
The following sections provide examples for configuring device parameters using either direct QEMU parameters or libvirt XML parameters.
CPU#
-cpu host -smp cores=12,threads=1,sockets=1
<vcpu placement='static'>12</vcpu>
<cpu mode='host-passthrough' check='none'>
  <topology sockets='1' cores='12' threads='1'/>
</cpu>
CPU Affinity#
Add the following QEMU parameter:
-name ubuntu-vm,debug-threads=on
Launch the guest OS, then get vCPU thread IDs by running:
ps -L -o comm,pid,lwp,psr -p $(pgrep qemu) | grep CPU
Then use taskset to pin CPUs. For example:
taskset -pc "$pcpu" "$lwp"
<cputune>
  <vcpupin vcpu='0' cpuset='0'/>
  <vcpupin vcpu='1' cpuset='1'/>
  <vcpupin vcpu='2' cpuset='2'/>
  <vcpupin vcpu='3' cpuset='3'/>
  <vcpupin vcpu='4' cpuset='4'/>
  <vcpupin vcpu='5' cpuset='5'/>
  <vcpupin vcpu='6' cpuset='6'/>
  <vcpupin vcpu='7' cpuset='7'/>
  <vcpupin vcpu='8' cpuset='8'/>
  <vcpupin vcpu='9' cpuset='9'/>
  <vcpupin vcpu='10' cpuset='10'/>
  <vcpupin vcpu='11' cpuset='11'/>
</cputune>
Memory#
Add the following host kernel parameters if you need 1 GiB hugepage size.
default_hugepagesz=1G hugepagesz=1G hugepages=24
-m 24G
Add the following if hugepages are required:
-object memory-backend-memfd,hugetlb=on,hugetlbsize=1G,id=mem1,size=24G -machine memory-backend=mem1
<memory unit='GiB'>24</memory>
<currentMemory unit='GiB'>24</currentMemory>
<memoryBacking>
  <hugepages>
    <page size='1' unit='GiB'/>
  </hugepages>
</memoryBacking>
Disk#
-drive file=/var/lib/libvirt/images/ubuntu24.04.qcow2,format=qcow2,cache=none,if=virtio
<disk type='file' device='disk'>
  <driver name='qemu' type='qcow2' cache='none'/>
  <source file='/var/lib/libvirt/images/ubuntu24.04.qcow2'/>
  <target dev='vda' bus='virtio'/>
  <address type='pci' domain='0x0000' bus='0x04' slot='0x00' function='0x0'/>
</disk>
Bridge Network#
Below is a method to create a bridge device in the host environment.
Create the following
systemd-networkdfiles on the host to set up bridge networking:
50-kvm.netdev50-kvm.network50-eth.network50-tap0.netdev
Automatically generate host networkd configuration files in /etc/systemd/network/:
sudo tee /etc/systemd/network/50-kvm.netdev << 'EOF_NETDEV'
[NetDev]
Name=kvm-br0
Kind=bridge
EOF_NETDEV

sudo tee /etc/systemd/network/50-kvm.network << 'EOF_KVM_NETWORK'
[Match]
Name=e* tap*

[Network]
Bridge=kvm-br0
EOF_KVM_NETWORK

sudo tee /etc/systemd/network/50-eth.network << 'EOF_ETH_NETWORK'
[Match]
Name=kvm-br0

[Network]
DHCP=ipv4
EOF_ETH_NETWORK

sudo tee /etc/systemd/network/50-tap0.netdev << 'EOF_TAP'
[NetDev]
Name=tap0
Kind=tap
EOF_TAP
Apply and verify networkd status:
sudo systemctl daemon-reload
sudo systemctl enable --now systemd-networkd
ip a show kvm-br0
Prevent NetworkManager from managing the network interface.
Option 1: Create unmanaged configuration.
# enp2s0 is a host interface; replace it with the actual interface on the host OS.
sudo tee /etc/NetworkManager/conf.d/unmanaged.conf << 'EOF_UNMANAGED'
[keyfile]
unmanaged-devices=interface-name:enp2s0
EOF_UNMANAGED
sudo systemctl restart NetworkManager
Option 2: Disable NetworkManager.
sudo systemctl disable NetworkManager
flush existing ip or reboot system, below is an example to flush existing ip.
sudo ip addr flush dev enp2s0
Add virtio-net parameters.
VM_NET_MAC="52:54:00:8d:85:0d"
-netdev tap,id=net0,ifname=tap0,script=/etc/qemu-ifup,downscript=no,vhost=on \
-device virtio-net-pci,netdev=net0,mac=${VM_NET_MAC}
Suggest different VM uses different mac address to avoid mac address conflict when more VMs are deployed.
<interface type='bridge'>
  <source bridge='kvm-br0'/>
  <model type='virtio'/>
  <driver name='vhost'/>
  <address type='pci' domain='0x0000' bus='0x01' slot='0x00' function='0x0'/>
</interface>
Passthrough PCI Device#
Bind the VFIO driver for the passthrough device.
# 0000:00:0b.0 is an example PCI device.
echo vfio-pci | sudo tee /sys/bus/pci/devices/0000:00:0b.0/driver_override
echo 0000:00:0b.0 | sudo tee /sys/bus/pci/devices/0000:00:0b.0/driver/unbind
echo 0000:00:0b.0 | sudo tee /sys/bus/pci/drivers/vfio-pci/bind
Attach the device in the QEMU parameter.
-device vfio-pci,host=0000:00:0b.0
<hostdev mode='subsystem' type='pci' managed='yes'>
  <source>
    <address domain='0x0000' bus='0x00' slot='0x0b' function='0x0'/>
  </source>
  <address type='pci' domain='0x0000' bus='0x05' slot='0x00' function='0x0'/>
</hostdev>
Passthrough Intel® iGPU#
Please refer to Build Romfile for the iGPU ROM file(iGPU_GOP.rom).
Bind the VFIO driver for the passthrough device.
echo vfio-pci | sudo tee /sys/bus/pci/devices/0000:00:02.0/driver_override
echo 0000:00:02.0 | sudo tee /sys/bus/pci/devices/0000:00:02.0/driver/unbind
echo 0000:00:02.0 | sudo tee /sys/bus/pci/drivers/vfio-pci/bind
Attach the device in the QEMU parameter.
-device vfio-pci,host=00:02.0,x-igd-gms=2,id=hostdev0,x-igd-opregion=on,romfile=/var/lib/libvirt/roms/iGPU_GOP.rom,addr=0x2
<domain type='kvm' xmlns:qemu='http://libvirt.org/schemas/domain/qemu/1.0'>
  <hostdev mode='subsystem' type='pci' managed='yes'>
    <source>
      <address domain='0x0000' bus='0x00' slot='0x02' function='0x0'/>
    </source>
    <rom file='/var/lib/libvirt/roms/iGPU_GOP.rom'/>
    <address type='pci' domain='0x0000' bus='0x00' slot='0x02' function='0x0'/>
    <alias name='ua-igd'/>
  </hostdev>
  <qemu:override>
    <qemu:device alias='ua-igd'>
      <qemu:frontend>
        <qemu:property name='x-igd-gms' type='unsigned' value='2'/>
        <qemu:property name='x-igd-opregion' type='bool' value='true'/>
      </qemu:frontend>
    </qemu:device>
  </qemu:override>
</domain>
OVMF#
Refer to Build OVMF Romfile to build custom OVMF files (OVMF_CODE_iGPU.fd, OVMF_VARS_iGPU.fd).
-drive if=pflash,format=raw,readonly=on,file=/usr/share/OVMF/OVMF_CODE_iGPU.fd \
-drive if=pflash,format=raw,file=/usr/share/OVMF/OVMF_VARS_iGPU.fd
<os>
  <type arch='x86_64' machine='q35'>hvm</type>
  <loader readonly='yes' type='pflash'>/usr/share/OVMF/OVMF_CODE_iGPU.fd</loader>
  <nvram template='/usr/share/OVMF/OVMF_VARS_iGPU.fd'>/var/lib/libvirt/qemu/nvram/ubuntu24.04_VARS.fd</nvram>
  <boot dev='hd'/>
</os>
Launch Ubuntu Virtual Machines#
Ensure KVM and virtualization are available on the host.
lsmod | grep kvm
sudo kvm-ok
Check qemu is ready and version.
qemu-system-x86_64 --version
expected result:
QEMU emulator version 8.2.2 (Debian 1:8.2.2+ds-0ubuntu1.17)
Copyright (c) 2003-2023 Fabrice Bellard and the QEMU Project developers
Ensure the VM image and firmware files exist (adjust paths as needed).
ls -lh /usr/share/OVMF/OVMF_VARS_iGPU.fd
ls -lh /usr/share/OVMF/OVMF_CODE_iGPU.fd
ls -lh /var/lib/libvirt/images/ubuntu24.04.qcow2
ls -lh /var/lib/libvirt/roms/iGPU_GOP.rom
If the guest image is not ready, please refer to Build Image. If OVMF and iGPU ROM file are not ready, please refer to Build OVMF Romfile to prepare OVMF and the iGPU ROM file.
Ensure bridge networking is configured and active.
Verify bridge network status on the host:
ip a show kvm-br0
Please refer to bridge_setting if bridge networking is not ready.
Launch VM example.
You can launch the guest VM with either:
A direct QEMU command (good for quick iteration)
libvirt (
virsh) domain management (good for lifecycle management)
Bind the VFIO driver for the passthrough device.
sudo modprobe vfio_pci
sudo systemctl stop gdm

bind_vfio() {
  local bdf="$1"
  local dev_path="/sys/bus/pci/devices/$bdf"
  local cur_driver

  if [[ ! -e "$dev_path" ]]; then
     echo "No such PCIe device, $bdf"
     return
  fi

  echo vfio-pci | sudo tee "$dev_path/driver_override" >/dev/null 2>&1

  if [[ -e "$dev_path/driver/unbind" ]]; then
    echo "$bdf" | tee "$dev_path/driver/unbind" >/dev/null 2>&1
  fi

  echo "$bdf" | sudo tee /sys/bus/pci/drivers/vfio-pci/bind >/dev/null 2>&1

  cur_driver=$(basename $(readlink /sys/bus/pci/devices/${bdf}/driver) 2>/dev/null)
  if [[ "$cur_driver" == "vfio-pci" ]]; then
     echo "Bound $bdf to vfio-pci successfully."
  fi
}

# 00:02.0 is Intel iGPU; 0000:00:14.0 and 0000:00:14.1 are USB controllers
bind_vfio 0000:00:02.0
bind_vfio 0000:00:14.0
bind_vfio 0000:00:14.1
Launch the VM
# host=00:02.0 is Intel iGPU
# host=0000:00:14.0 is USB controller
VM_NET_MAC="52:54:00:8d:85:0d"
sudo qemu-system-x86_64 \
  -name ubuntu-vm,debug-threads=on \
  -enable-kvm \
  -machine q35 \
  -cpu host \
  -smp cores=12,threads=1,sockets=1 \
  -m 24G \
  -object memory-backend-memfd,hugetlb=on,hugetlbsize=1G,id=mem1,size=24G \
  -machine memory-backend=mem1 \
  -drive if=pflash,format=raw,readonly=on,file=/usr/share/OVMF/OVMF_CODE_iGPU.fd \
  -drive if=pflash,format=raw,file=/usr/share/OVMF/OVMF_VARS_iGPU.fd \
  -drive file=/var/lib/libvirt/images/ubuntu24.04.qcow2,format=qcow2,cache=none,if=virtio \
  -netdev tap,id=net0,ifname=tap0,script=/etc/qemu-ifup,downscript=no,vhost=on \
  -device virtio-net-pci,netdev=net0,mac=${VM_NET_MAC} \
  -device vfio-pci,host=00:02.0,x-igd-gms=2,id=hostdev0,x-igd-opregion=on,romfile=/var/lib/libvirt/roms/iGPU_GOP.rom,addr=0x2 \
  -device vfio-pci,host=0000:00:14.0 \
  -serial mon:stdio \
  -nographic \
  -vga none
Prepare the domain XML.
Please refer to example.xml.
Define and start the VM.
virsh define ubuntu24.04_example.xml
virsh start ubuntu24.04
virsh list --all
Reboot and shut down the VM.
virsh reboot ubuntu24.04
virsh destroy ubuntu24.04
KVM Management Solutions#
The following sections provide examples for managing VMs using either the direct QEMU monitor or libvirt.
QEMU Monitor#
QEMU Monitor is a runtime management and debugging interface provided by QEMU. Even if the Guest OS is already unresponsive, as long as the QEMU process still exists, you can usually use the Monitor to check the Guest-side and QEMU-side status.
QEMU Monitor can be used to inspect:
vCPU status;
CPU registers;
PCI devices;
Memory map;
IRQ status;
QEMU threads;
Guest memory dump.
Using a Unix Socket Monitor#
QEMU startup parameter:
-monitor unix:/tmp/qemu-monitor.sock,server,nowait
Connection method:
nc -U /tmp/qemu-monitor.sock
Using a Telnet Monitor#
QEMU startup parameter:
-monitor telnet:127.0.0.1:9999,server,nowait
Connection method:
telnet 127.0.0.1 9999
Or:
nc 127.0.0.1 9999
Verify the port:
ss -lntp | grep 9999
lsof -i:9999
Common QEMU Monitor Commands#
Command |
Description |
|---|---|
|
Show the status and execution state of all virtual CPUs in the guest. |
|
Display the current CPU register values of the selected virtual CPU. |
|
List all PCI devices currently visible to the virtual machine. |
|
Display the guest physical memory map and QEMU memory region hierarchy. |
|
Show interrupt routing and current IRQ status of the virtual machine. |
|
Pause virtual machine execution while keeping its state intact. |
|
Resume execution of a previously paused virtual machine. |
|
Reset the virtual machine as if the hardware reset button had been pressed. |
|
Create a Guest memory dump and save it to the specified file for crash analysis. |
|
Show QEMU Monitor command information. |
Libvirt#
libvirt is a commonly used management framework for KVM/QEMU, and virsh is the command-line management tool provided by libvirt. For VMs managed by libvirt, it is recommended to use virsh first for the following operations:
Check VM status, configuration, and vCPU information;
View or export the VM XML configuration;
Start, shut down, reboot, or forcibly stop a VM;
Trigger a Guest memory dump through the libvirt management interface;
Check libvirt and QEMU logs.
Common Management Commands#
Command |
Description |
|---|---|
|
List all Guest VMs, including Guest VMs that are shut off. |
|
Show basic information about a Guest VM. |
|
Export the Guest VM XML configuration. This is useful for troubleshooting device passthrough, CPU pinning, memory configuration, and similar issues. |
|
Check vCPU pinning status. |
|
Check vCPU binding information. |
|
Connect to the Guest VM console. |
|
Shut down the Guest VM gracefully. |
|
Forcibly power off the Guest VM. Use this command with caution. |
|
Start a Guest VM that is currently in the shut off state. |
|
Reboot a Guest VM that is currently running. |
Recommended VM Dump Method#
If the VM is managed by libvirt, it is recommended to use virsh dump to export Guest memory:
virsh dump <vm_name> /tmp/guest.core --memory-only
If you want to minimize interruption to the running Guest, you can try:
virsh dump <vm_name> /tmp/guest.core --memory-only --live
If you want the VM to be marked as crashed after the dump:
virsh dump <vm_name> /tmp/guest.core --memory-only --crash
Notes:
/tmp/guest.coreis a path on the Host file system;The file size is usually close to the Guest memory size;
For device passthrough scenarios, prefer
--memory-onlyto avoid additional complexity introduced by device state.
Checking libvirt / QEMU Logs#
journalctl -u libvirtd -b
journalctl -u libvirtd -f
sudo cat /var/log/libvirt/qemu/<vm_name>.log
It is recommended to preserve the debugging context:
mkdir -p debug_logs
sudo cp /var/log/libvirt/qemu/<vm_name>.log debug_logs/
journalctl -u libvirtd -b > debug_logs/libvirtd.log
dmesg > debug_logs/dmesg.log
KVM Debugging Solutions#
Core debugging solutions for a KVM Guest OS can be divided into two categories:
Guest memory dump + crash: suitable for scenarios where the Guest hangs or becomes unresponsive but the QEMU process still exists;
kdump + crash: suitable for scenarios such as guest kernel panic, oops, or actively triggered panic.
Both approaches require a matching vmlinux file. vmlinux must come from the kernel build that the Guest OS was running when the issue occurred.
Debug Preparation#
Crash Tool#
The crash tool version provided by Ubuntu 22.04/24.04 may fail to parse dump files, so a newer version of crash needs to be built.
Install Build Dependencies#
sudo apt update
sudo apt install -y \
 build-essential \
 bison \
 flex \
 texinfo \
 zlib1g-dev \
 liblzma-dev \
 libexpat1-dev \
 libgmp-dev \
 libmpfr-dev \
 libmpc-dev \
 wget \
 binutils \
 git
Get the crash Tool Source Code#
Download crash 9.0.2 source code from crash_9.0.2, extract it:
tar xf 9.0.2.tar.gz
cd crash-9.0.2
Prepare the GDB 16.2 Source Package#
crash 9.0.2 requires gdb-16.2.tar.gz.
Download link: GDB-16.2
Place it in the crash source root directory:
crash/
 ├── Makefile
 ├── gdb-16.2.tar.gz
 ├── gdb-16.2.patch
 └── ...
If automatic download fails due to a network proxy, manually download it and copy it into this directory.
You can also extract it manually:
tar xf gdb-16.2.tar.gz
Build crash 9.0.2#
make -j$(nproc)
The build process usually performs the following steps:
Extracts
gdb-16.2;Applies
gdb-16.2.patch;Configures and builds GDB;
Merges GDB into crash;
Generates
./crash.
If a previous build failed, it is recommended to clean and rebuild:
make clean
make -j$(nproc)
If clearer error output is needed:
make -j1
Common Build Errors#
Missing GMP / MPFR
Error:
configure: error: Building GDB requires GMP 4.2+, and MPFR 3.1.0+.
Solution:
sudo apt install -y libgmp-dev libmpfr-dev libmpc-dev
make clean
make -j$(nproc)
vmlinux#
Whether the dump file is guest.core or vmcore, crash analysis requires:
sudo crash vmlinux guest.core
Or:
sudo crash vmlinux /var/crash/<timestamp>/vmcore
The vmlinux file must be the uncompressed ELF image with symbols that correspond to the kernel running in the Guest OS when the dump was generated.
Check the currently running kernel in the Guest:
uname -r
If the debug symbol package is installed, a common path is:
/usr/lib/debug/boot/vmlinux-$(uname -r)
If vmlinux cannot be found, obtain it in the Guest OS by installing the -dbg Debian package through apt, or compile the kernel source package to generate and install a Debian package with debug symbols. For example, if the kernel is 6.17.11-intel-ese-experimental-lts-rt, install:
linux-image-6.17.11-intel-ese-experimental-lts-rt-dbg.deb
After obtaining vmlinux, check whether vmlinux and the dump file match.
Check the Linux version string in the dump:
sudo strings guest.core | grep "Linux version" | head
Check the Linux version string in vmlinux:
strings vmlinux | grep "Linux version" | head
Notes:
guest.coreis a full memory image and may contain multiple historical kernel banners, dmesg ring buffers, or module strings;strings guest.corecan only be used as a reference and should not be the only basis for judgment;The most reliable approach is to confirm the exact kernel build running in the Guest when the dump occurred, and use the corresponding
vmlinuxfrom that build.
Check file formats:
sudo file guest.core
file vmlinux
Expected output:
guest.core: ELF 64-bit LSB core file
vmlinux: ELF 64-bit LSB executable/shared object, x86-64
kdump#
Prerequisites#
If you want an ECI kernel to support kdump, the kernel needs to enable kexec/kdump-related configuration options. At minimum, the following kernel configuration options should be enabled:
CONFIG_CRASH_DUMP=y
CONFIG_KEXEC=y
CONFIG_KEXEC_FILE=y
CONFIG_PROC_VMCORE=y
If these options are missing, you may see symptoms such as:
The
kdump-toolsservice fails to start;/sys/kernel/kexec_crash_loadedis not1;After panic, the system cannot enter the second kernel;
/proc/vmcoredoes not exist or the dump cannot be saved.
For ECI kernel compilation, refer to: Linux BSP
Installation#
Install inside the Guest OS:
sudo apt update
sudo apt install -y kdump-tools crash
Enable the service:
sudo systemctl enable kdump-tools
sudo systemctl restart kdump-tools
systemctl status kdump-tools
Check whether the crash kernel is loaded:
cat /sys/kernel/kexec_crash_loaded
Expected output:
1
Configure crashkernel#
Edit grub:
sudo vim /etc/default/grub
Add or modify the kernel command line, for example:
GRUB_CMDLINE_LINUX="crashkernel=1G console=tty0 console=ttyS0,115200n8"
Update grub and reboot:
sudo update-grub
sudo reboot
Verify crashkernel:
dmesg | grep -i crashkernel
cat /sys/kernel/kexec_crash_loaded
Expected output:
1
Manually Trigger Panic to Validate kdump#
Enable SysRq:
echo 1 | sudo tee /proc/sys/kernel/sysrq
Trigger panic:
echo c | sudo tee /proc/sysrq-trigger
After the system reboots, check:
ls -lah /var/crash/
Analyze vmcore:
sudo crash vmlinux /var/crash/<timestamp>/vmcore
Guest Memory Dump + crash#
This solution is suitable for:
Guest OS hangs;
Guest is unresponsive but the QEMU process still exists;
Exporting a Guest physical memory image from the Host side;
Analyzing Guest kernel stack, task state, interrupt state, or memory state.
Purpose of dump-guest-memory#
dump-guest-memory is a QEMU Monitor command used to export a Guest physical memory image. It usually contains:
Guest physical RAM;
CPU state;
ELF header;
Memory layout.
It does not directly display:
kernel stack;
call trace;
backtrace.
To view the guest kernel stack, use crash or gdb together with the matching vmlinux to analyze guest.core.
Exporting guest.core Through QEMU Monitor#
dump-guest-memory /tmp/guest.core
Forward the QEMU Monitor command through virsh:
virsh qemu-monitor-command <vm_name> --hmp \
    "dump-guest-memory /tmp/guest.core"
If the VM is managed by libvirt, you can also use:
virsh dump <vm_name> /tmp/guest.core --memory-only
Analyzing guest.core with crash#
sudo crash vmlinux /tmp/guest.core
After entering the crash> prompt, you can use the following commands to inspect Guest OS information:
Crash Command |
Purpose |
|---|---|
|
Show system information. |
|
Show kernel log or panic information. |
|
Show the backtrace of the current context. |
|
Show the task list. |
|
Show backtraces for all tasks. |
|
Show runqueue information. |
|
Show interrupt information. |
|
Show memory overview. |
|
Show slab information. |
|
Show module information. |
|
Quit crash. |
kdump + crash#
This solution is suitable for:
Guest kernel panic;
Guest kernel oops;
Automatically saving
vmcoreinside the Guest when a panic occurs;Analyzing panic-scene kernel stack, task table, runqueue, IRQ, modules, and similar information.
Basic Principle of kdump#
kdump relies on the kexec/kdump mechanism. When the first kernel panics, the system jumps to the reserved crash kernel, and the second kernel saves /proc/vmcore to /var/crash/<timestamp>/.
Typical output directory:
/var/crash/<timestamp>/
├── dmesg.<timestamp>
└── vmcore
In Ubuntu/Debian kdump-tools, the following may also be generated:
/var/crash/<timestamp>/
├── dmesg.<timestamp>
└── dump.<timestamp>
dump.<timestamp> may be a flattened format generated by makedumpfile -F, and it must be converted to a standard ELF vmcore before it can be analyzed by crash.
kdump + crash Debugging Flow#
Guest kernel panic
  ↓
kdump second kernel starts
  ↓
Save vmcore or dump.<timestamp>
  ↓
If needed, convert dump.<timestamp> to vmcore
  ↓
Analyze with crash 9.0.2 + matching vmlinux
Common Debugging Issues#
Dump Conversion Succeeds but crash Analysis Fails#
If makedumpfile -R successfully generates vmcore, but running crash exits at the following stage:
please wait... (gathering task table data)
And you have already confirmed that:
vmlinuxexactly matches the first kernel that panicked;vmcoreis already an ELF core file;The crash tool version is new enough;
Then it is very likely that the filtering level of makedumpfile is too aggressive, causing key memory pages required by crash analysis to be filtered out.
Current setting:
MAKEDUMP_ARGS="-c -d 31"
Recommended change to a more conservative filtering level:
sudo vim /etc/default/kdump-tools
Change:
MAKEDUMP_ARGS="-c -d 31"
To:
MAKEDUMP_ARGS="-c -d 1"
If this configuration does not exist in the file, you can add it directly.
Restart kdump-tools:
sudo systemctl restart kdump-tools
Confirm that the crash kernel is reloaded:
cat /sys/kernel/kexec_crash_loaded
Expected output:
1
Then collect or trigger a new kdump file, and run:
cd /var/crash/<new_timestamp>
makedumpfile -R vmcore < dump.<new_timestamp>
sudo crash /path/to/matching-vmlinux vmcore
If you can then enter:
crash>
It indicates that the root cause was that -d 31 filtered out key memory pages needed by crash analysis.
Recommendation:
In ECI/ESE RT Kernel or Guest VM panic debugging scenarios, prefer:
MAKEDUMP_ARGS="-c -d 1"
After confirming that the dump is analyzable, evaluate whether to increase the filtering level according to disk space and dump size.